2 DOSAGE AND ADMINISTRATION
2 DOSAGE AND ADMINISTRATION
2.1 Important Administration Instructions
Dextrose Injection (5%) is intended for intravenous use.
- •
- Use a peripheral vein to administer if the final dextrose concentration is 5% or less and the osmolarity is less than 900 mOsm/L.
- •
- To avoid venous irritation, consider using a central vein to administer hypertonic solutions with osmolarity of 900 mOsm/L or greater [see Warnings and Precautions (5.4)].
- •
- Do not administer Dextrose Injection (5%) simultaneously with blood products through the same administration set because of the possibility of pseudoagglutination or hemolysis.
- •
- Use of a final filter is recommended during administration of parenteral solutions, where possible.
- •
- Discard the unused portion.
- •
- Do not use the Dextrose Injection (5%) ADD-VantageTM diluent containers with chemotherapy agents.
2.2 Important Preparation Information
Visually inspect the Dextrose Injection (5%) for particulate matter and discoloration. Do not administer Dextrose Injection (5%) if the solution is cloudy, there are precipitates, and the container is damaged.
To reduce the risk of air embolism, adhere to the following preparation instructions for Dextrose Injection (5%):
- •
- Use a non-vented infusion set or close the vent on a vented set.
- •
- Use a dedicated line without any connections (do not connect flexible containers in series).
- •
- Do not pressurize the flexible container to increase flow rates.
- •
- If using a pumping device to administer Dextrose Injection (5%), turn off the pump before the container is empty.
To Open:
- •
- Peel overwrap at corner and remove solution container.
- o
- Use unit within 30 days of opening overwrap, as long as the use date does not exceed the printed expiration date.
- •
- Some opacity of the plastic due to moisture absorption during the sterilization process may be observed. This is normal and does not affect the solution quality or safety. The opacity will diminish gradually.
To Assemble Vial and Flexible Diluent Container:
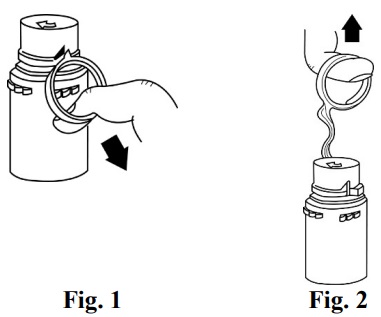
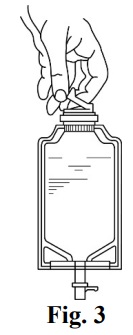
Preparation for Administration:
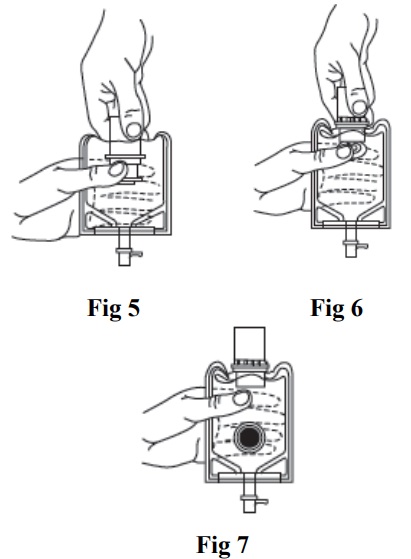
- 1.
- Confirm the activation and admixture of vial contents.
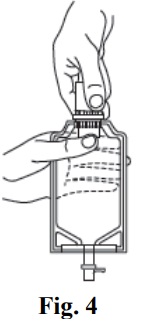
- 2.
- Check for leaks by squeezing the container firmly. If leaks are found, discard the unit because sterility may be compromised.
- 3.
- Close the flow control clamp of the administration set.
- 4.
- Remove the cover from the outlet port at the bottom of the container.
- 5.
- Insert the piercing pin of the administration set into the port with a twisting motion until the pin is firmly seated. Note: See full directions on the administration set carton.
- 6.
- Lift the free end of the hanger loop on the bottom of the vial, breaking the two tie strings. Bend the loop outward to lock it in the upright position, then suspend the container from the hanger.
- 7.
- Squeeze and release the drip chamber to establish the proper fluid level in the chamber.
- 8.
- Open the flow control clamp and clear air from set. Close clamp.
- 9.
- Attach the set to the venipuncture device. If the device is not indwelling, prime and make venipuncture.
- 10.
- Regulate the rate of administration with the flow control clamp. Do not use the flexible container in series connections.
2.3 Dosage Considerations
The choice of dextrose concentration, rate, and volume depends on the age, weight, clinical, and metabolic conditions of the patient and concomitant therapy.
Dextrose Injection (5%) administration rate should be based on the patient’s tolerance of dextrose, especially for preterm neonates with low birth weight.
Increase the infusion rate gradually as needed; frequently monitor blood glucose concentrations to avoid hyperglycemia [see Warnings and Precautions (5.2), Use in Specific Populations (8.4)].
Additional Resources
Chat online with Pfizer Medical Information regarding your inquiry on a Pfizer medicine or vaccine.
Speak with a Pfizer Medical Information Professional regarding your Pfizer medicine or vaccine inquiry.
Available 9AM-5PM ET Monday to Friday; excluding holidays.
Submit a medical question for a Pfizer medicine or a vaccine.
The submission will be reviewed during our standard business hours.
To report an adverse event related to a Pfizer product and you are not part of a clinical trial* for this medication, click the link below to submit your information:
Pfizer Safety Reporting Site
*If you are involved in a clinical trial for either product, adverse events should be reported to your coordinating study site.
If you cannot use the above website to report an adverse event related to a Pfizer medication, please call (800) 438-1985.
You may also contact the U.S. Food and Drug Administration (FDA) directly to report adverse events or product quality concerns either online at www.fda.gov/medwatch or by calling (800) 332-1088.